47.2 Get TreeAge model input values from Excel
This section describes all the steps needed to get specific TreeAge (TP) model input values from an Excel workbook. This will allow the model parameters to be updated outside of TreeAge Pro (in Excel) to impact the model analysis when it is run.
|
If the TreeAge model file and the Excel workbook are located in the SharePoint (cloud based) file system you need to ensure:
|
To demonstrate the steps, we will work with the Bilinks tutorial example model MarkovCancerDecision_before.trex and the Excel Workbook MarkovCancerDecision_inputs_and_outputs.xls. The completed version of the model after walking through the steps below is MarkovCancerDecision_bilinks.trex.
We will specifically focus on the model input cLocal_New by connecting that TreeAge Pro variable to a cell in the Excel workbook. The same steps can then be applied for any number of model inputs.
Create a Named Cell in the Excel Workbook
Before an Excel cell (or range) can be connected to TreeAge Pro, it must first be named.
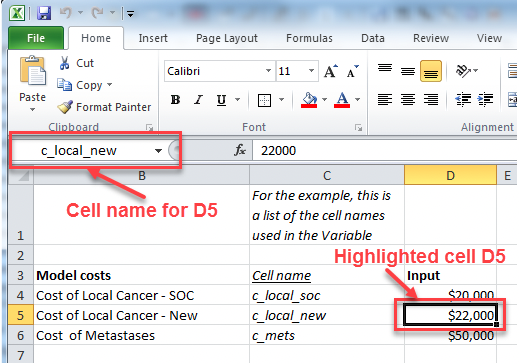
In the workbook, we want to connect our model input cLocal_New to cell D5 in the Excel worksheet “Model inputs”.
-
Open the Excel workbook MarkovCancerDecision_inputs_and_outputs.xls.
-
Select the worksheet: Model Inputs.
-
Select cell D5 (the cell we want).
-
Click in the Name box in the top-left corner (as highlighted below) and type the name we are assigning to this cell as “c_local_new”. Then press Enter.
-
Ensure the name is a single word, using underscores if required.
-
-
When you select the cell, the new cell name should appear in the Name Box in Excel.
To change the name of a cell in Excel:
-
Navigate to the Formulas Tab.
-
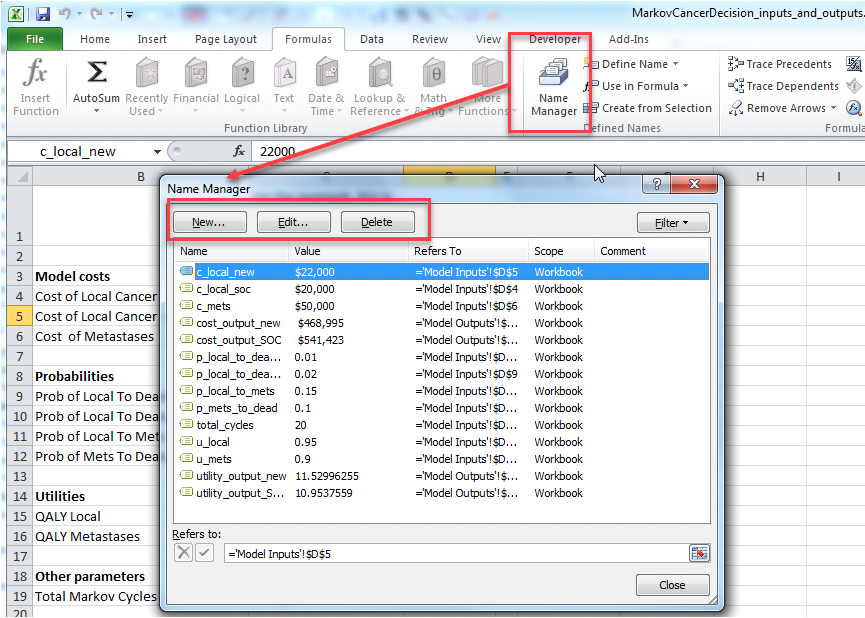
Select Name Manager and the dialogue below will open. It lists all the named cells in the spreadsheet (current or historical).
-
Select the name you want to edit (from the first column) and use the buttons at the top to Edit or Delete them as appropriate.
In the figure below you can see that to change any cell name, use the Name Manager in the Formulas tab. The table will then allow names to be edited and updated.
Note that you can also name a range of cells as detailed in section Using a single Bilink to a range of cells.
Connect the TP model to an Excel workbook
For our example, we want to connect our model “MarkovCancerDecision_before.trex” to the workbook “MarkovCancerDecision_inputs_and_outputs.xls”. They are found in the same folder.
-
Open Tree Preferences.
-
Navigate to the category Excel Workbook > Bilinks connections.
-
Select the appropriate Excel workbook in the “spreadsheet source file” at the top.
-
Click “Apply and close”.
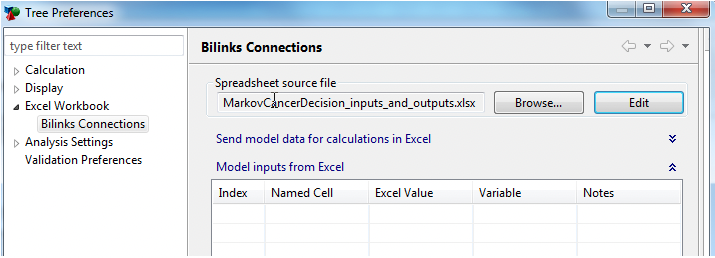
If the TP model and the Excel workbook are in the same folder, no path information is required. If they are not, enter the full path to the Excel workbook of just select Browse to locate the file along with its path.
While a model can only be connected to a single Excel workbook at a time, you can change the connection to a different workbook. However, the new workbook must have all the required Named Cells for the model to run.
The Excel file with the Named Cells must be saved before connecting it to the TreeAge model.
Create the TreeAge Pro Bilink to send data from Excel to TreeAge Pro
-
Open Tree Preferences.
-
Navigate to the category Excel Workbook > Bilinks Connections.
-
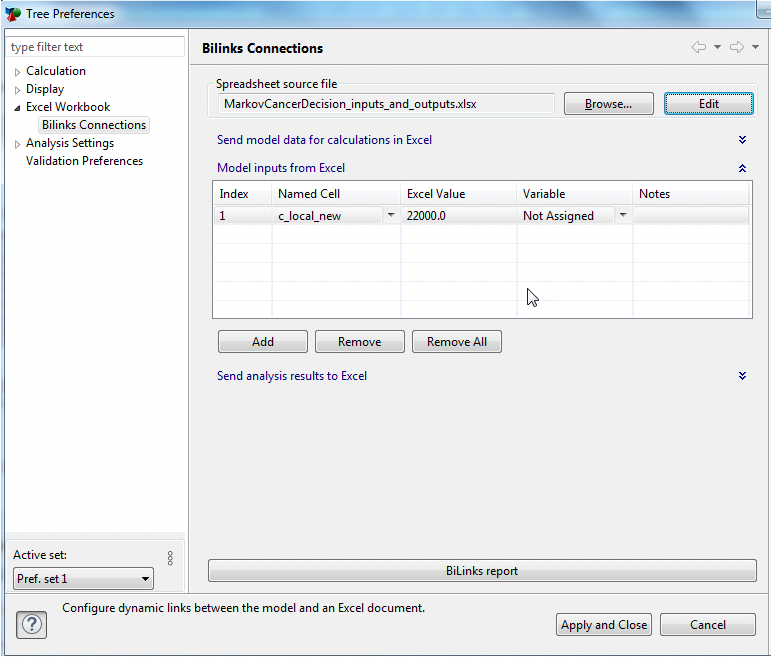
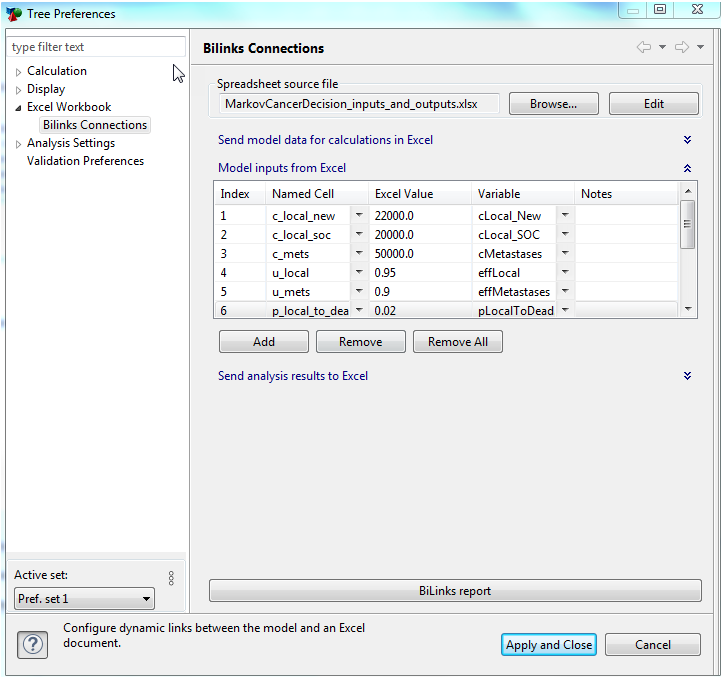
In the "Model inputs from Excel” section (the middle option set), click the Add button. This adds a single row representing that specific model input. (See figure below).
-
To add the link to cLocal_New, set the values in the columns as follows:
-
Index: Defaults to 1 as the first Bilink in this model.
-
Named Cell: Use the drop down menu to select the Named Cell c_local_new in the Excel file.
-
Excel Value: This displays the value of the linked Named Cell from Excel.
-
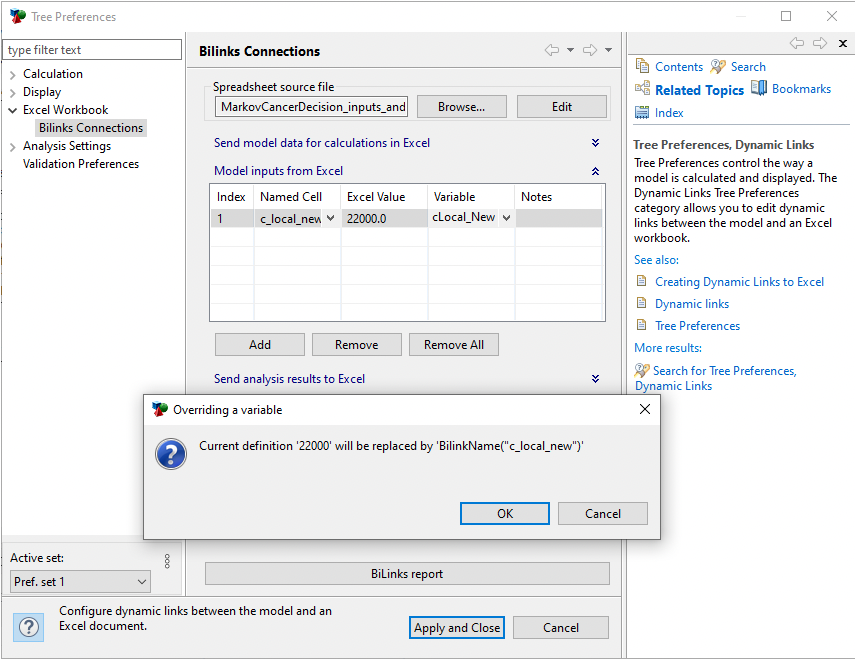
Variable: When we add the link there is no variable assigned. Use the dropdown menu to assign this link to the appropriate variable in TreeAge. In this case: cLocal_New. A pop-up asks you if you want to override the current value in TreeAge, and just select OK (as per the images below).
-
Notes: Nothing required here in this example.
-
-
Click Apply and Close.
At this point, the Bilink is in place and referenced within the TreeAge Pro model.
Manually connect a TreeAge Pro input variable to the Bilink
We recommend to use the method above to assign the values to the correct TreeAge Pro variables. But you can do this manually in the Variable View too:
-
Open the Variables View.
-
Edit the variable definition for cLocal_New by clicking on it or using the Formula Editor.
-
Set the variable definition to BilinkName(“c_local_new”).
-
Note that the quotation marks are required for the function BilinkName.
-
You can also reference the Bilink by index using Bilink(1) with no quotes.
-
Now the input variable cLocalNew is directly connected to the Named Cell c_local_new. If you change the value in Excel, it will impact TP model results.
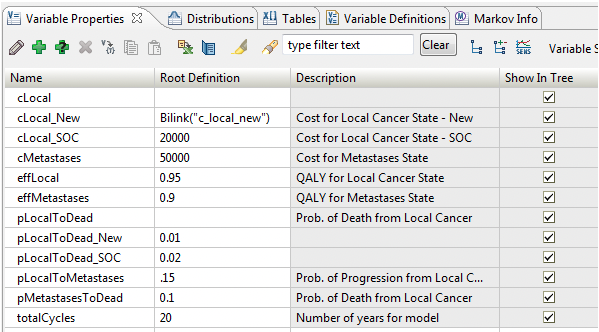
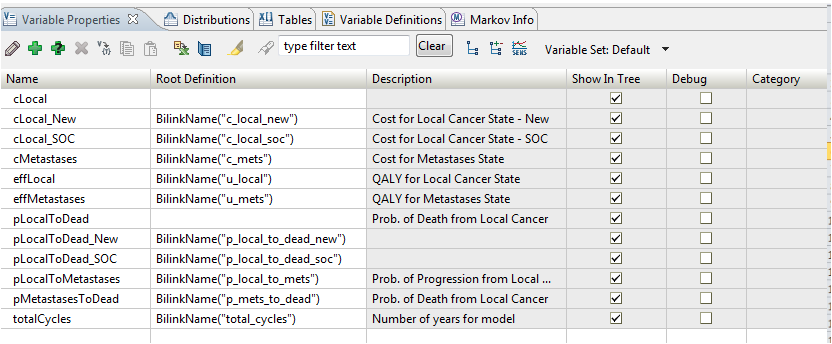
Repeat this process for other model inputs as needed. The example model MarkovCancerDecision_BiLinks.trex has all TP model inputs connected to Excel. The figure below shows the connections.
Once completed, the Variables View shows all the Bilinks set for all the variables.
If you are adding several Bilinks, you might choose to use the Bilinks Report within Tree Preferences. This will provide you with a list of all the indices and names you need for the next step.
