10.3 Variables View
The Variables View is used to manage variables and their properties for variables which apply to the entire tree. Therefore, the Variables View is a tree-level view rather than a node-level view. There are some variables which are defined in specific parts of the tree, and these will be defined on the Variables Definitions View.
To open the Variables View:
-
Choose Views > Variables from the toolbar.
Below is an image of the Variables View from the Get Started tutorial example model CE-DecisionTree.trex.

The main grid contains a list of the tree's variables along with a few of the key variable properties - such as whether we want to show the variable in the Tree or not. These properties can be edited within the grid. If you change the variable name (in the Name column), all references to that variable within the tree will be modified as well.
The Calculated Value column evaluates the root node definition (which could be a formula) and provides the calculated value of that formula at the root node. If the formula references the keywords _stage or _time, those keywords will have the value of 0 as it would be at the starting point for the model. If the formula references a tracker, the initial value will be used.
The Variables View toolbar provides additional functions.

The functions associated with the icons are listed below - moving from left to right. Some of the functions require a variable to be highlighted for the function/tool to become active. Each function is described in subsequent sections.
-
Edit Variable
-
Add Variable
-
Add Multiple Variables
-
Delete Variable
-
Convert Variable to Tracker
-
Copy Variable
-
Paste Variable
-
Edit in Excel
-
Generate Variables Report
-
Highlight
-
Search for references to variable in the Tree
-
Type Filter Text (to filter the list of variables) and clear
-
Show Categories Tree/Group Variables by Category
-
Show Sensitivity Analysis range and intervals
-
Variable Set (select/change/create)
Edit Variable
This function is used to edit the properties of the selected variable. Only one variable can be selected.
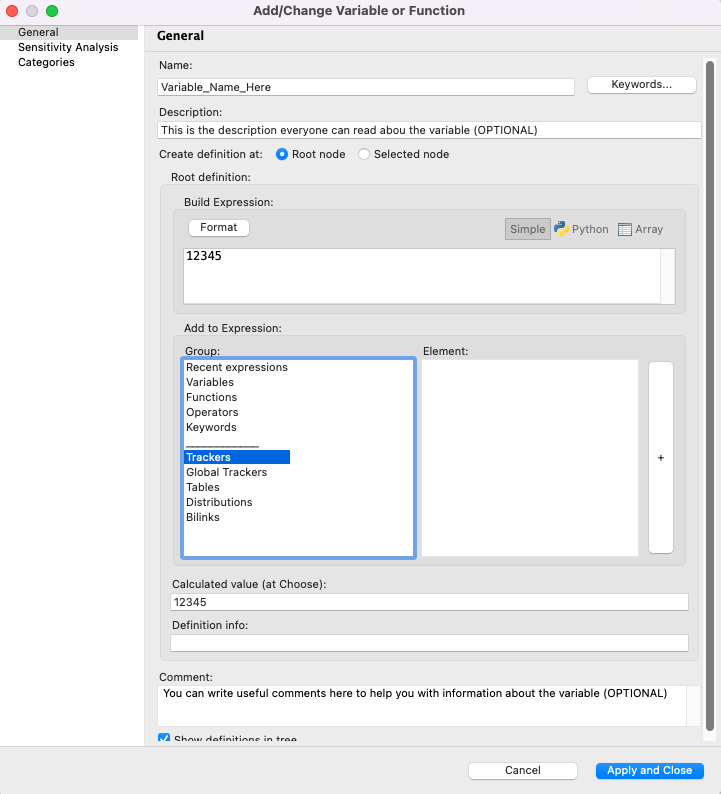
The Add/Change Variable or Function Dialog will open with the properties of the selected variable displayed.

Within this dialog, you can edit the variable's properties - name, description, comment. You can also enter a variable definition at the root node either by entering the definition or via the formula editor or content-assist.
Within the Root Definition section, there are two main areas Build Expression and Add to Expression.
-
Build Expression: The expression that is being modified by the Formula Editor.
-
Add to Expression: The elements to add to the expression are found here and are:
-
Group: List of items you may want to add to a function - such as other Variables, Keywords etc.
-
Element: Individual item to add to the expression.
-
"+": A button to add the selected Element to the Build Expression editor. (You can just double click on the element and it will be added directly into the expression).
-
When the changes are complete, click "Apply and Close" to save.
Note that the Add/Change Variable or Function dialog contains three property categories - on the left-hand-side in the white space. These are:
-
General - Maintains main variable properties as described above.
-
Sensitivity Analysis - Maintains sensitivity analysis range and correlations. Refer to Variable Range for Sensitivity Analysis section.
-
Categories - Maintains Variable Categories associated with the variable. Refer to Variable Categories section.
Add Variable
This function is used to add a new variable to the model. The Add/Change Variable or Function Dialog (see prior section) will open with a default variable name and default properties (mostly blank). If you have selected to add a variable and you are not at the Root node, you will be able to select where you want to Create the Definition either: Root Node or Selected Node. A Variable should either be added at the Root node or at the Selected node.
The same details apply as when Editing a Variable, with the exception that this will be the first time you are creating the variable.
Add Multiple Variables
This function works the same as Add Variable except that you can add a number of variables at a time. Each time to finish adding a variable, a new Add/Change Variable or Function Dialog will appear for you to add the next one.
Delete Variable
This function is used to delete one or more selected variables from the tree. Deleting variable(s) will also delete all definitions for the affected variable(s).
Expressions that reference deleted variables will no longer function correctly. These expressions will need to be updated.
Convert Variable to Tracker
This function converts the variable into a tracker. Trackers are used in Microsimulation to store and retrieve data associated with individual trials. Refer to the Individual-Level Simulation and Markov Models Chapter for details on the use of trackers (LINK to be updated).
When executed, this function opens the Add/Change Tracker Dialog to allow you to create the tracker from the existing variable. After you click OK in the Add/Change Tracker Dialog, the variable is converted to a tracker.
Copy and Paste Variable(s)
These functions copy one or more variables (including names and root node definitions) and paste them into another model.
To copy a variable:
-
In the Variables View, select the row to copy by clicking anywhere in the row. The 'copy' icon will become active.
-
Select the copy icon, as highlighted in the figure below.
![]()
To paste a variable:
-
Open the destination model, and select the 'paste' icon in the Variables View, as in the figure below.
![]()
To copy multiple variables, select one variable, then hold down the Ctrl key while selecting other variables. Then use the steps outlined above to copy the selected variables and pasting in the destination model.
Edit in Excel
This function exports the tree's variables to an Excel worksheet. You can then edit the variables within the worksheet and send the new properties/values back to TreeAge Pro.
Generate Variables Report
This function creates a report of all the variables in the tree including each variable's name and selected properties. The example below shows the report highlighting two variables which are unused in the specific model.

The Variables Report can be useful in determining which variables are unused (and might be deleted). It can also be used to retrieve calculated values based on the applicable variable definition (at the selected node or closest one to the left).
Similar to other reports, the Variables Report can be exported to a number of external formats including HTML and Excel.
Highlight
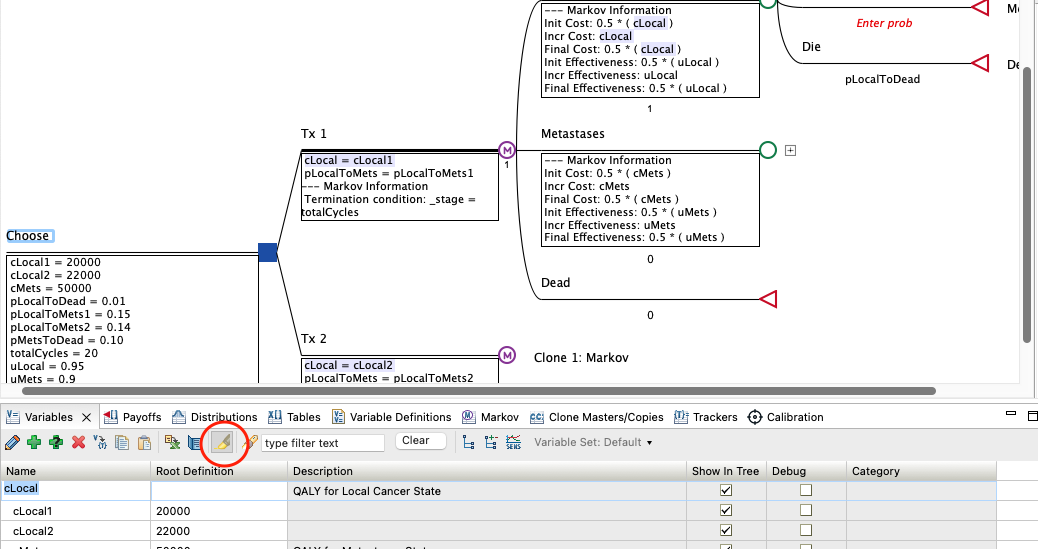
When this option is depressed, the selected variable is highlighted within the model in the Tree Diagram Editor as in the figure below.

Find References in Tree
Click this icon to trigger an immediate search within the model for that variable. The Search will find all variable definitions and all references to the variable.
Filter Text/Clear
The Filter Text field allows you to filter the list of variables to show only variable names that match the Filter Text. For example:
-
Enter a single letter, and all the variables which start with this letter will be shown. If you use a naming convention then you can filter by "c" and you would see all the variables such as cost_LocalCancer, cLocal etc.
-
Enter an asterisk before the expression to look for text in the middle of the variable name rather than the front. For example, if you entered "*local" into the Filter Text, the variables cost_LocalCancer, cLocal and p_LocalToMets would be shown.
Show Categories Tree/Group Variables by Category
The Show Categories Tree toggle switch splits the Variables View into two panes, adding a left-side pane for managing Variable Categories. Click the icon again to hide the category pane. Refer to the Variable Categories section for details.
The Group Variables by Category function changes the display within the Variables View to group the variables within the assigned categories.
Sensitivity Analysis range
Selecting the Sensitivity Analysis range will open up the table and provide a way to enter details specific to doing One-way and Tornado Analysis on your model. You can edit any of the details in the additional columns from Range Type across to whether you want to use the variable in Tornado Analysis.

More details about Sensitivity Analysis can be found in the section: Sensitivity Analysis
Variable Sets
The Variable Set options lets you create and also select different Variable Sets. These are very useful and allow you to run the same model with different "sets" of input parameters. More details about creating variable sets in found in the section: Variable Sets - different model inputs, same model.
