14.2 Creating and Editing Tables
Before entering values into a table, you must first create a table.
To create a new table:
-
Open the Tables View.
-
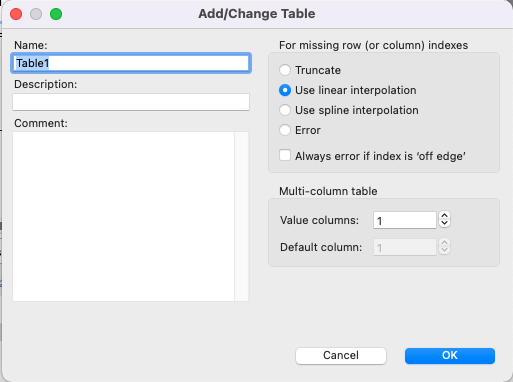
Click the "add" toolbar button. This will open the Add/Change Table Dialog.
-
Enter the table name and properties into the dialog (see below). The specific property options will be describer later in this chapter.
-
Click OK to save the table and close the dialog.

After the table is created, it will appear in the tables list within the Tables View. You can then edit the properties of the new table.
To edit the properties of an existing table:
-
Select a table in the list.
-
Click the "edit" button in the toolbar (the pencil).
-
Change the table properties in the Add/Change Table Dialog.
Table lookup methods
During tree calculations, if a formula references a table using an index value that matches a row index in the table exactly, TreeAge simply returns the value from the appropriate column in that row. However, when a reference is made to a non-existent row/index, the table’s missing row lookup method determines what is returned.
The missing row/column lookup methods are:
-
Truncate: If rows with lower indexes exist, returns the value from the row with the highest index that is less than or equal to the requested index; otherwise, returns the value from the first row (i.e., the lowest index value).
-
Use linear interpolation: Returns a value calculated by linear interpolation between existing indexes. This is the default lookup method.
-
Use spline interpolation: Returns a value calculated by cubic spline interpolation between existing indexes. Note that splines follow trends among index/value pairs rather than simple linear interpolation.
-
Error: Report an error if an index value is provided that is not in the table.
Each table also has an “If index is out of range” option to determine what to return if an index is provided that is outside the index range within the table.
-
Use edge value: Use the lowest index of the highest index as a match if depending on whether the index provided is too low or too high for the table's index range. This is the default.
-
Error: Report an error if an index value is provided is outside the table's index range.
-
Use zero: Return 0 if the index provided is too low or too high for the table's index range.
Note that the next section Referencing Tables via Table Lookup provides examples to see how interpolation works.
Multi-column table options
While many tables will have an index column and a single value column, you can add more value columns to the model (but not more index columns). Add to the number of value columns as needed.
If your model has more than one value column, you will need to specify the default value column to use if a table lookup only provides the index and not a value column.
Entering values in a table
To populate a simple table, use the table entries toolbar and table data grid to the right size of the Tables View.
To enter table data:
-
Select the table in the tables list.
-
Click the "Add Row" button (green plus) in the table entries toolbar. A new table row will appear in the table data grid.
-
Change the values for the data row as needed, both the index and value entries.
-
Repeat prior two steps to add more data rows.
This method of entering data can be time consuming. There are other methods available for loading table data. Those methods are described below.
Loading/copying tab-delimited table data
To modify the values in an existing TreeAge Pro table, it may be more efficient to copy the table of data into a spreadsheet or text file for editing. Or, if you have a new, empty TreeAge Pro table, you can create the table in a spreadsheet, and then copy and paste into the table directly.
To edit table data in Excel or a text editor:
-
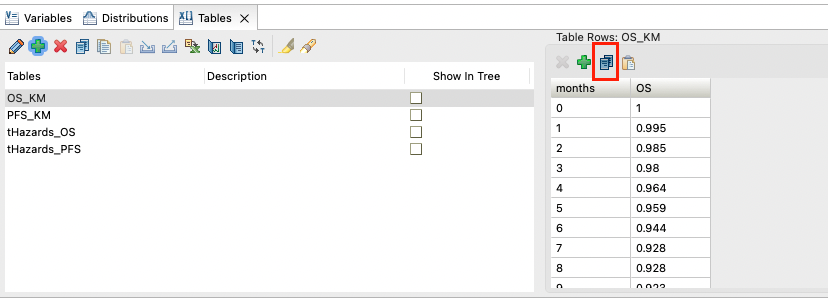
Select the table in the Tables view.
-
Click the Copy button in the Table Rows editor, as shown below.
-
Paste the rows into a spreadsheet or text document.
-
Edit the data as tab-delimited text.
-
Copy the table data, including headers, into the clipboard.
-
Click the Paste button in the table editor to paste the table back into original table.

Take note of the following requirements:
-
A column title row is not required. If one is not included, they will read: Index, Value1, Value 2 etc. Otherwise you can select any column heading (Index or Value columns) and rename them.
-
The selected range of cells in Excel should use either General, Text, or Number formatting (avoid accounting formats using parentheses for negatives numbers).
-
The copied range should not include empty columns or rows.
-
Note that the Paste Table command first removes existing rows from the table. However, the command is Undo-able.
-
If the Paste command is not available, or does not work, see the bulleted list of suggestions above on proper cell formatting in the source document. If all else fails, try first pasting the spreadsheet data into a plain text file to remove formatting, and then copy the text file data into TreeAge.
Editing index and value column headers
You can enter custom column headers for the index and value columns by clicking on the header. You can then enter the custom column header into an input dialog.

Editing table data in Excel
You can export table data to Excel, edit the data in Excel, then import the edited data back into TreeAge Pro.
