20.3 Cloning subtrees
Cloning subtrees allows you to reuse portions of the model structure without having to create or maintain the duplicated structure.
While you can duplicate existing subtrees by copying and pasting, clones provide the advantage of synchronizing the original structure and the cloned copy so any changes you make to the original clone master subtree are also automatically integrated into the cloned copy subtree.
The key differences between copy/paste and clones are:
-
Copy/paste: copied structure is independent and can be edited.
-
Clone: cloned structure cannot be edited because it remains synchronized with master structure.
Clone copies function exactly like their associated clone master. However, variables within the clone master (and copy) can reference different variable definitions. This allows you to use different values for the variables within the clone master and copy. The example below will show this in more detail.
A few notes on clones:
-
Multiple clone masters can be used in a tree, and can be nested.
-
Each clone master can have multiple associated clone copies.
-
Variables (and state bindings) referenced within a clone master can calculate differently in clone copies if the variables are defined differently outside the master/clone.
-
Cloning only works within a single model tree.
20.3.1 Creating clone masters and attaching copies
The first step in the cloning process is to select the subtree which is to be the clone master for the purpose of being replicated at another location in the tree. The clone master does not have to be a finished structure; all that is required is a single branch. The master subtree can continue to be updated after copies of it have been attached to other nodes in the tree.
You can manage all the clone masters and copies using the Clone Master/Copies View. Many operations described below can also be done in this View, and you can see the end of this section about the Clone Master/Copies View.
Each subtree which is a designated aclone master can be identified by a heavy bar beneath the branch leading to its root node. The copied subtree, the "cloned" part, will not include the root node of the clone master node, only its subtree.
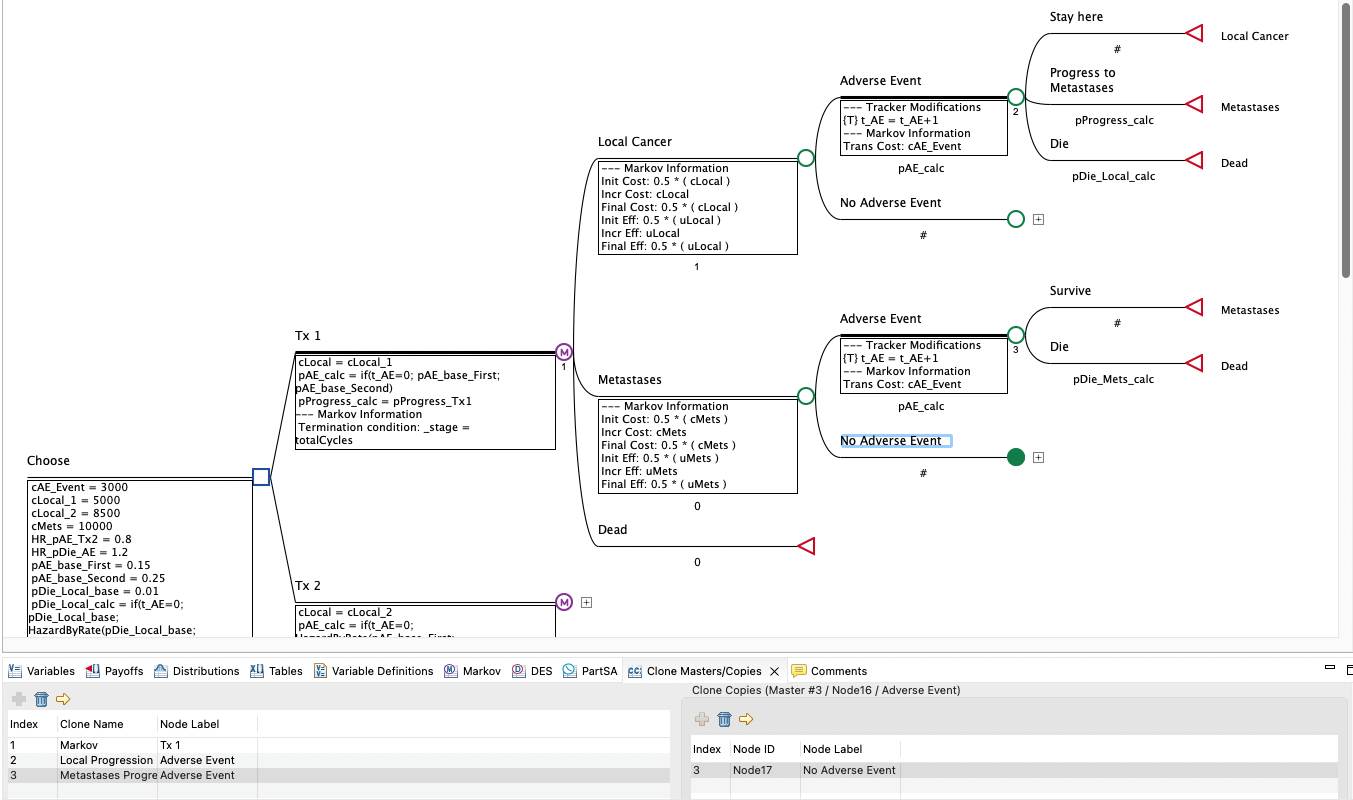
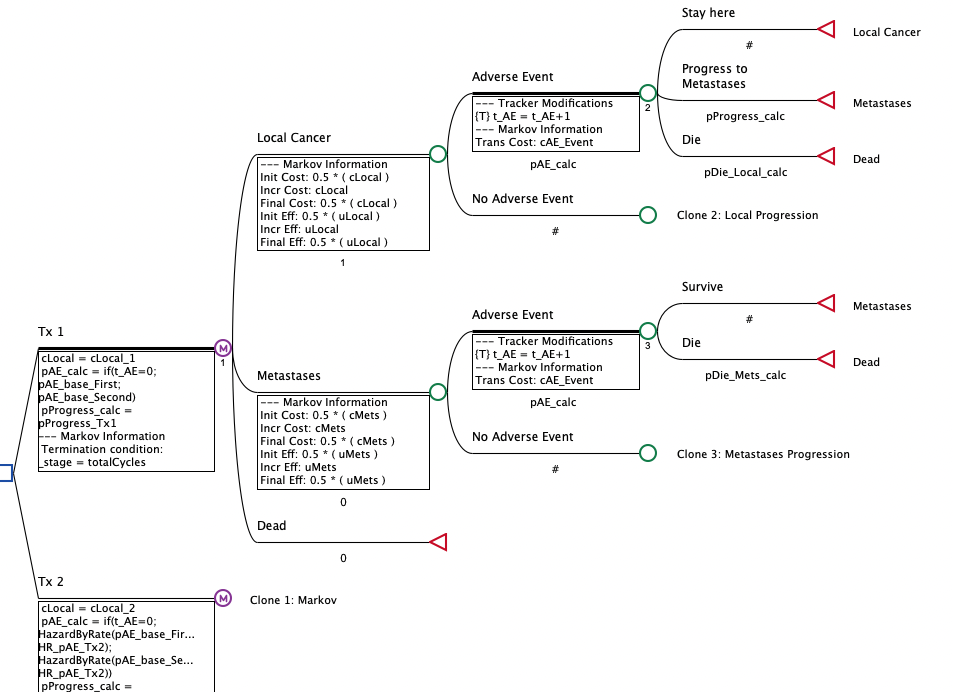
The remainder of this section uses the Health Care tutorial example model, Markov Cancer Decision - Clones for AE.trex, shown below with existing clone masters/copies listed in the Clone Master/Copies View.
To create a clone master:
-
Identify the master subtree and select the "anchor" node to the left of that subtree.
-
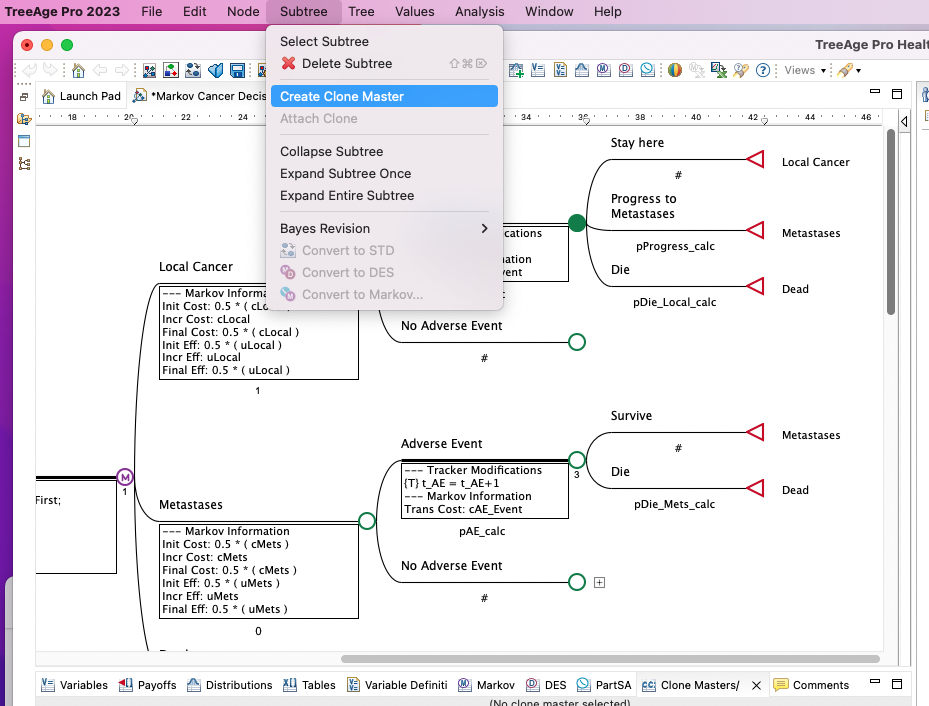
Choose Subtree > Create Clone Master from the menu.
-
Provide a short, descriptive name to identify this clone master. For the figure below, we call the master: Local Progression.
Clone masters are also assigned a numeric index which appears next to the clone master node and identified with a bold line.
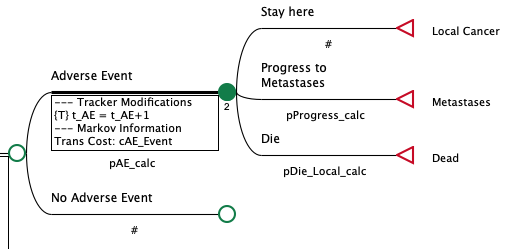
Note that the clone master above is anchored at the Adverse Events node, which is not actually part of the clone master subtree. However, all nodes to the right of that anchor node are part of the clone master subtree.
Once the clone master has been created, the next step is to attach the clone copies at the appropriate node(s).
Clone copies can only be attached to nodes which have no branches. The nodes where you attach a clone copy should have the same node type as the root node of the master subtree. Attaching a clone copy to a node will not automatically change the type of the node to match the clone master’s root node. This change can be made manually, if necessary, either before or after attaching the clone copy. In our example, we will attach the new clone master to the No Adverse Event node (note that its subtree has been deleted before the attach clone steps below).
To attach a clone copy:
-
Select an appropriate "anchor" node (i.e., a node with no descendants) where you want to attach the clone copy subtree.
-
Choose Subtree > Attach Clone.
-
If you have only a single clone master in the tree, it will be attached to the selected node automatically. Otherwise, you must select the name of the appropriate clone master from a list, and click OK. In this case, we select Local Progression.

The clone copies can either be hidden or shown. You can change options in the "Hide clone-copy subtrees" option in the Tree Preferences, as below.
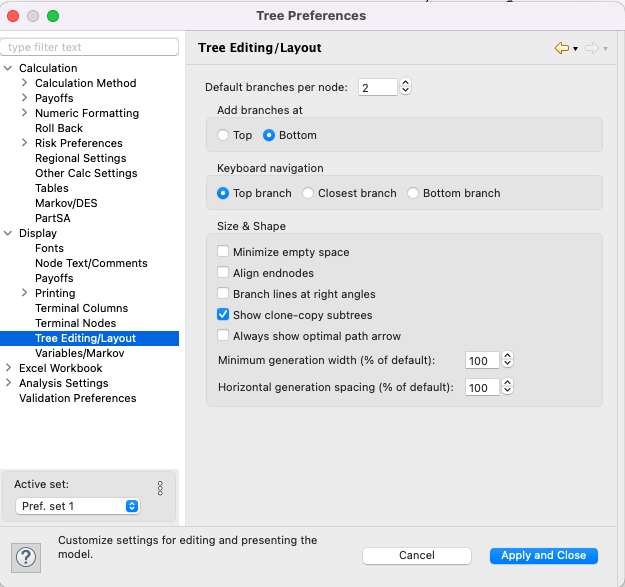
Reducing the tree size by hiding clone copies enhances the layout of the tree. The essential features of the replicated subtree can be seen by examining the clone master, which is the only instance of the subtree being displayed. In addition, the cloning linkages within the model, which might otherwise be missed, are clearly visible as each clone copy indicates the master to which it is linked to.
20.3.2 Destroying and detaching clones
If you want to remove clone copies from a tree, you can either destroy the current clone master (automatically detach its clone copies) or detach the selected clone copies one at a time. There are two ways to destroy a clone master.
To eliminate a clone master in the tree:
-
Select the clone master subtree or the subtree's root node.
-
Choose Subtree > Destroy Clone Master from the menu.
To eliminate a clone master using the Clones Masters/Copies View:
-
Select the clone master in the list, and click the Delete ("Trashcan") toolbar button.
Destroying a clone master will “un-publish” the subtree. The subtree which was formerly the clone master will remain in the tree; all of its clone copies will be removed. You will be prompted with the option to replace those clone copies with independent copies of the clone master.
To detach clone copies:
-
Select the clone copy subtree or the subtree's root node.
-
Choose Subtree > Detach Clone Copy from the menu.
You will be asked if you want to keep an editable copy of the cloned subtree at the selected node. If you answer Yes, then the clone copy subtree is replaced by an independent copy of the clone master subtree. If you answer no, the clone copy subtree is simply removed.
20.3.3 The Clone Masters/Copies View
The Clone Masters/Copies View allows you to view and edit clones within the tree.
To open the Clone Masters/Copies View:
-
Choose Views > Clone Masters/Copies from the toolbar.
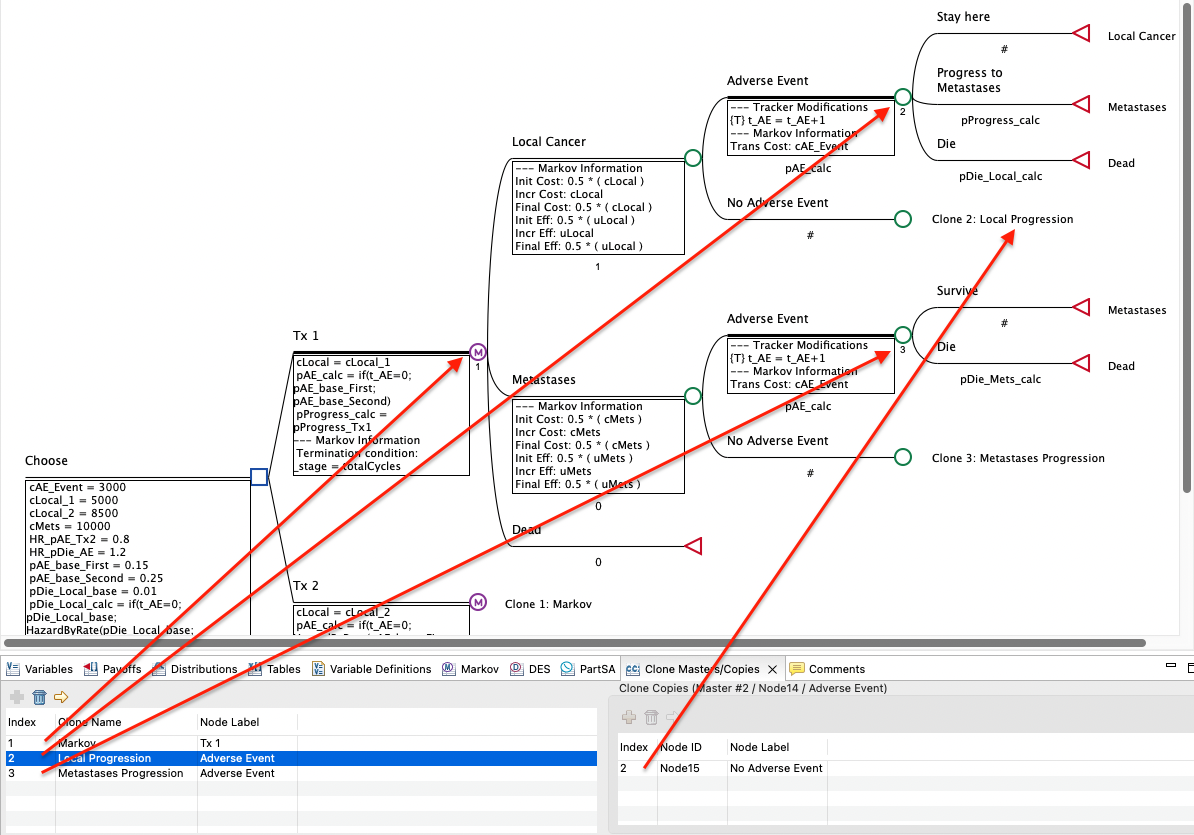
The arrows in the figure above demonstrate the relationships between the clone masters/copies in the view and in the model.
Clone masters are listed in the left pane of the view. When one is selected, the clone copies associated with that view are listed in the right pane.
Both clone masters and clone copies can be deleted through this view with the same options and restrictions associated with deleting these elements in the Tree Diagram Editor, as described in an earlier section.
The yellow arrows in the two toolbars of the Clones Masters/Copies View can be used to move directly to either a clone master or a clone copy in the Tree Diagram Editor.
20.3.4 Nesting Clones
An important aspect of clones is the ability to nest clone masters. In other words, a single subtree may be comprised of multiple independent clone masters and also include various clone copies.
The tree shown below in the next section has two nested clone master subtrees. Clone masters 2 and 3 are nested within other clone masters and their copies.
You cannot attach a copy of a master subtree to itself. To create recursion, use a Markov node instead.
20.3.5 Using variables within clones
Calculations in clone copies are performed as if a full copy of the master subtree existed at the location of the clone copy.
Since clone copies are identical to the clone master, variables must be used in the clone master if you want its copies to have different probabilities and values. The probability, reward, and payoff expressions in the clone master and its copies will all use the same variables. However, each will be able to use different values for these variables based on how the variables are defined outside the clones. Variables referenced within the clones can be defined outside the clones. By defining variables differently to the left of the clone master and its clone copies, different values can be used by the same variable references within the clone master and copies.
The Health Care tutorial example tree Markov Cancer Decision - Clones for AE.trex provides a relatively simple example of using variables with clones.
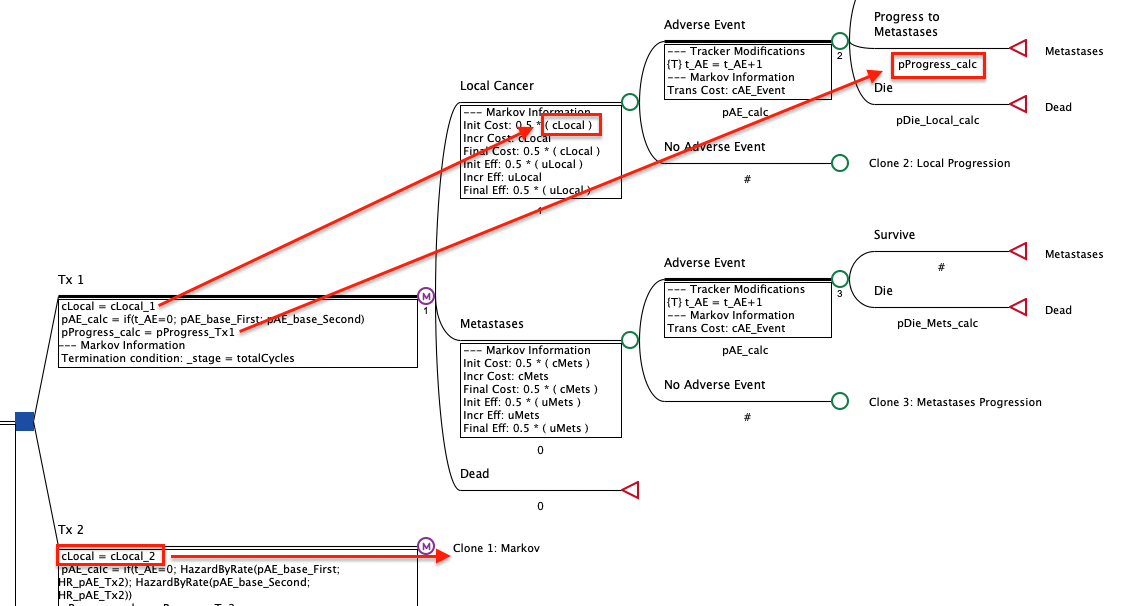
Note that the variable cLocal is used in the clone master, meaning it is also used in the clone copy (for Tx 2). However, at the root of the clone master and clone copies, the variable is defined differently. The variables cLocal_1 and cLocal_2 are both defined in the Variable Properties View, but then depending on context within the model, cLocal is set equal to one or the other. This allows a different values for the cost of Local Cancer in this case to be used in Tx 1 and Tx 2. Similarly, the probability pProgress_calc is different based on whether it is in Tx 1 or Tx 2.