20.3 Roll back
As described in the section Analyze a Legal Model, roll back refers to the calculation of expected values starting at the terminal nodes and continuing back to the root node. We will use the Legal example BreachOfContract-Variables.trex. In TreeAge Pro, a variety of information is reported in the tree when it is rolled back.
To roll back the tree:
-
Select Analysis > Roll Back (or click the beach ball icon in the tool bar).
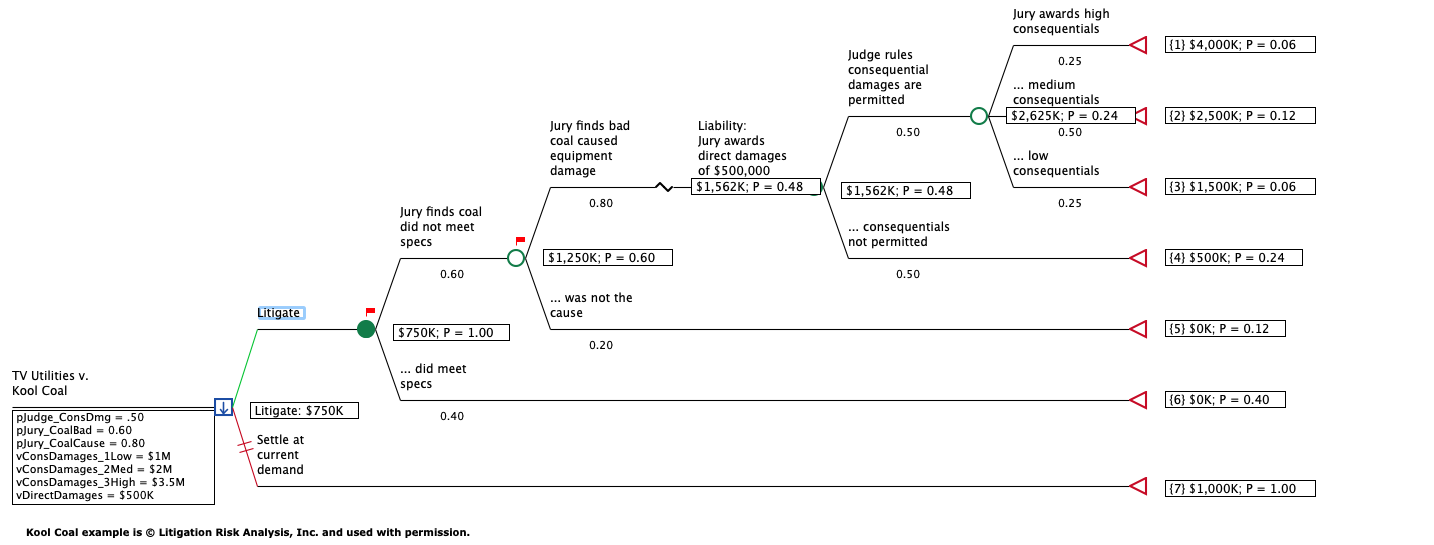
The rolled back tutorial example, BreachOfContract-Variables.trex, is shown below.

Note that expected values are displayed in roll back boxes at every node. The favored strategy, Litigate, is highlighted in green, while the branch connector to the rejected strategy, Settle at current demand, is highlighted in red and displayed with hash marks.
To turn off roll back:
-
Select Analysis > Roll Back (again).
20.3.1 Roll back display details
Decision nodes: A box to the right of the node reports the name and expected value of the preferred alternative. TreeAge Pro marks the branches of non-optimal alternatives using hashes, and colors the optimal branch.
Chance nodes: A box to the right of the node reports the expected value. Probabilities are calculated (if necessary) and displayed beneath the node’s branches.
Terminal nodes: A box to the right of the node reports the calculated payoff value.
20.3.2 Customizing the roll back display
A picture of the rolled-back tree can be printed or exported to a graphic file; see Exporting/printing graphs and models for details.
There are many ways to customize the appearance of the rolled-back tree prior to printing or exporting it. In addition to the basic options described on the following page, there are a wide variety of other tree display preferences related to roll back (for example, setting up terminal node columns); see Controlling Layout, Formatting and Display of Trees to learn how to adjust the display.
Values displayed in the rolled back tree are displayed using the tree’s numeric formatting settings; see the section Numeric Formatting for details on modifying these preferences.
When roll back is turned on, initially all nodes in the optimal path are selected (highlighted). Clicking on the tree will deselect these nodes.
Occasionally, a roll back box will cover the text of a branch description or probability. This can be corrected by moving the box.
To move a roll back box:
-
Click and drag the box to a better location.
It is also possible to hide individual roll back boxes.
To hide a selected node’s roll back box:
-
With the tree rolled back, right-click on the node whose roll back box you want to hide.
-
From the pop-up quick menu, choose Hide roll back box.
Notes on roll back boxes:
-
Roll back box state will be saved with the tree.
-
A hidden roll back box can be redisplayed by right-clicking on the node and choosing Hide roll back box again.
-
If you want to reset hidden and moved roll back boxes in a section of the tree, cut the subtree and then paste it back into place.
20.3.3 Changing the Cohort Size
You can apply a fixed cohort size to your model, which multiplies all model calculations by that fixed number.
To apply the cohort size:
-
Open Tree Preferences.
-
Navigate to category Calculation > Roll Back.
-
Enter a "Constant cohort size" value.
All values shown in rollback and in the Decision Tree Pathway Report will be multiplied by the cohort size.
