5.3 Create tree structure - strategies and pathways
TreeAge has different layouts (or perspectives) to assist with building models. At the top right-hand corner of TreeAge, select the Build perspective and the interface layout will change to present you with tool bars, editors, and views related to model building.
In the figure below, the button to select the Build perspective is highlighted in red. The tool bar has commonly used tools for building models.
 .
.
The model we are working in has a single Decision Node. Above the node you can see the red text indicating you can enter a label for the node. The label usually describes the decision we are making. In this case we will label the Decision node: Choose treatment for tumor.
-
Select the "Enter label" text and type into the text box: Choose treatment for tumor.
-
Select Enter to complete the label.
We will now create the tree structure for the Healthcare model described in the section Defining the problem
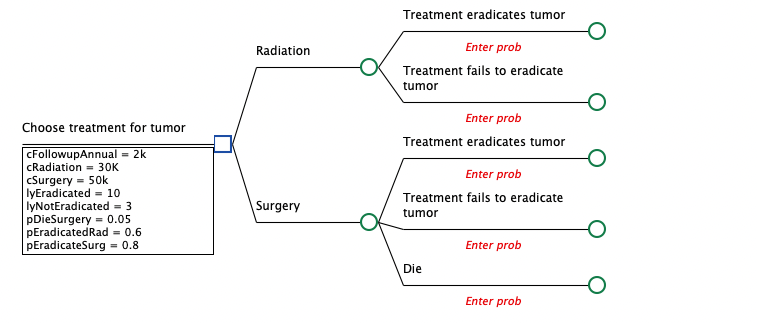
Branches must be added to the decision node to represent each strategy. For this model, the branches are Radiation and Surgery.
To add branches:
-
Select the Decision Node.
-
Click the ‘Add branches’ toolbar icon which will add two branches.
-
... OR ...
-
Right-click on the decision node and select Add Branch from the context menu. Two chance nodes will be added as branches.
-
... OR...
-
Double-click in the decision node which adds two branches.
-
Select the red text above the branches and label as indicated in the figure below.

Don't be confused by the terms branch and node. They both refer to the same element of a tree model. The term branch is normally used to describe the specific nodes that emanate directly from a parent node (the closest node to the left).
To complete the Tree Structure:
Each strategy has at least two outcomes:
-
Treatment eradicates tumor; or
-
Treatment fails to eradicate tumor.
The strategy of Surgery has an additional outcome of death.
For each strategy, repeat the following steps:
-
Select the strategy node and double click to add two branches … OR ... use the toolbar to add two branches.
-
Label the top branch "Treatment eradicates tumor" and the bottom branch "Treatment fails to eradicate tumor".
-
For the Surgery strategy, add a third branch and label it "Die".
The tree should now look like the figure below.
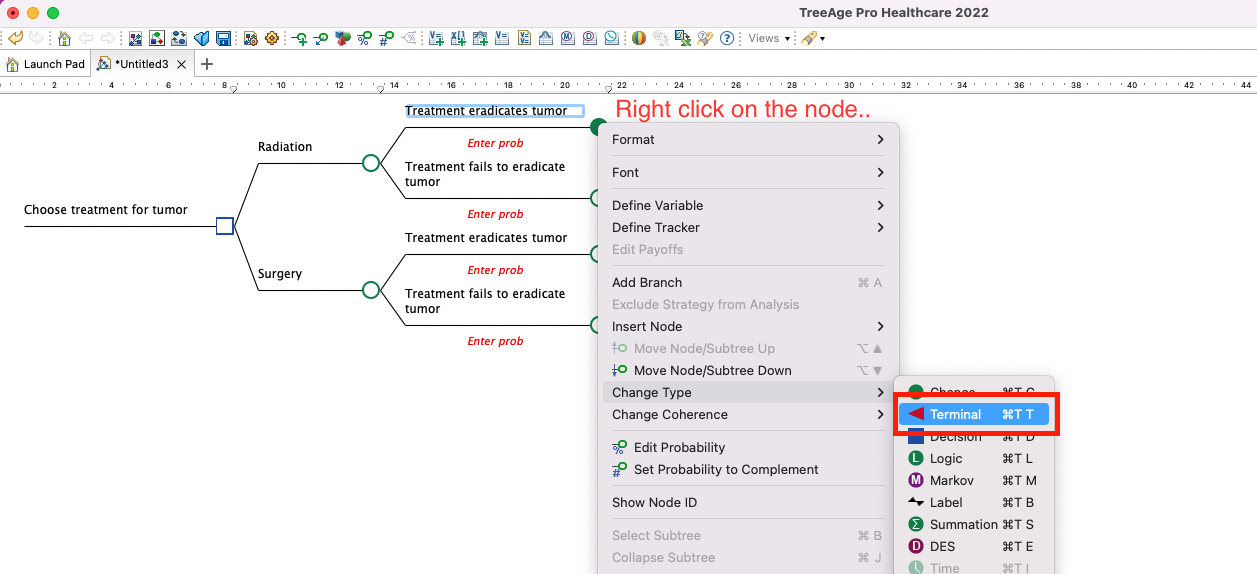
The tree structure is almost complete and each scenario just needs to be terminated. This will allow the appropriate cost and effectiveness value to be entered for each scenario. There are five scenarios in our model which need to be terminated. Let’s start with the top most scenario: Radiation > Treatment eradicates tumor.
To terminate scenarios/ end nodes:
-
Right-click on a node with no branches (in this case the Treatment eradicate tumor).
-
Select Change Type > Terminal from the context menu (see figure below).
-
... OR ...
-
Select the Treatment success node.
-
Click the "Change node type" icon on the toolbar and select terminal from the list of node types.
After changing the node to a Terminal node, TreeAge will automatically open an Edit Payoff dialog for the node. This is shown in the figure below.
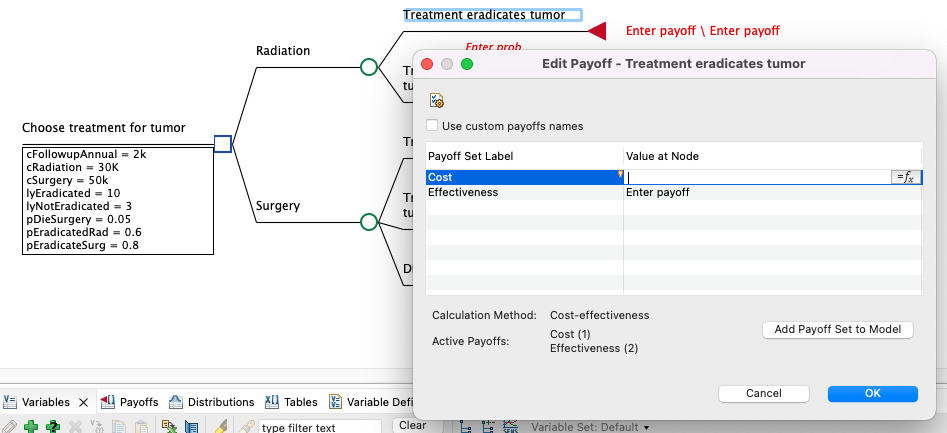
Because the calculation method is set to Cost-effectiveness, the dialog prompts for you to enter payoff values for both cost and effectiveness. We will skip entering payoffs now (but return to this once we have entered numeric values into the model) and select OK. Repeat the same process for the other end nodes too. The model will look like the figure below.
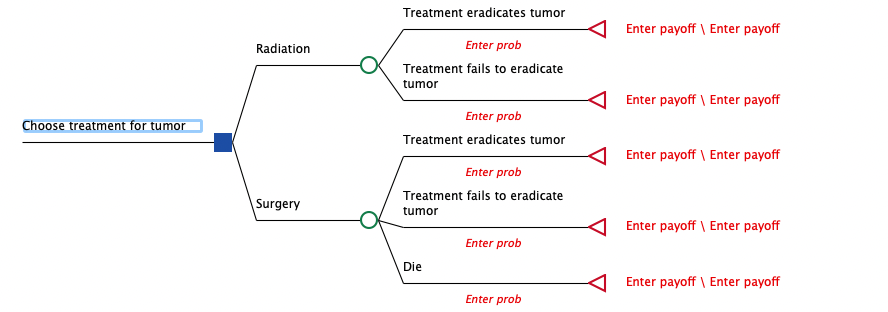
All of the red text in the figure above indicates we need to enter values such as probabilities and payoffs into the tree before we can evaluate it. The next section will look at creating variables and then entering these into the model.
Saving the tree
Now that all necessary nodes have been added, it is a good time to save your work.
TreeAge Pro models are documents. You save, open, and close trees and other documents in TreeAge Pro the same way you do in other programs — using the File menu commands. To save a TreeAge Pro document:
-
Choose File > Save … OR ... select the "save" icon (floppy disc) on the tool bar.
-
In the Save As dialog, select or create a directory, type "Healthcare Example Tree" for the file name, and press ENTER or click Save.
You can re-open the tree at any time by using the File menu to navigate to where you saved the tree.
OTHER INFO
The node furthest to the left within the model is called the root node. All models must have a single root node from which all other nodes emanate, either directly or indirectly.
To resize a node label (or text box):
Node (and other) labels entered into text boxes may wrap depending on the length of the description. Follow these instructions to resize the text box.
-
Use the tick markers above and to the right of the text box in the ruler bar.
-
Hover over the tick mark until a double arrow appears and then drag to resize the text box, as in the figure below.
-
All text boxes directly above and below a given text box will also change size.
-
Fonts and alignments of the node labels and nodes can also be changed via the Tree Preferences > Display settings which you can access via the tool bar.